If you wan't to take advantage of the latest Version of the famous Postgresql Database Server (9.0.3 at the time of writing this post) on Ubuntu 10.10 (Maverick), you might probably find out that the Ubuntu Software Center does not include this version yet.
Now, you should tell your system to pull down the latest list of software from each archive it knows about, including the PPA you just added.
Fortunately it can be installed easily with the apt system and the packages provided by Martin Pitt. Just follow the steps described below.
Step 1. Add the PPA to your system
PPA is the abbreviation for "Personal Package Archive" and is a service on Launchpad, a software collaboration platform to share pre-build packages for different Linux architectures and distributions.
A PPA needs to be recognized by apt (Advanced Packaging Toolkit), therfore you need to introduce it and it's signing key. In a terminal window type:
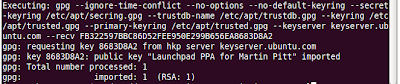
sudo add-apt-repository ppa:pitti/postgresqlThe result should look similar to this screenshot.
sudo apt-get updateIf you no take a look at the available packeages, r.g. with the Synaptic Packet Manager, you will see that several Postgresql 9 packages are available.
Step 2: Install Postgresql
Now you are prepared to install Postgresql with apt:
sudo apt-get install postgresql-9.0You will see a list of the packages which will be installed and upgraded. Confirm with "Y", if you wan't to go on. Now the installation will take place.
Several tasks are done during the installation. To have a better understanding what's going on, here are the most important:
- All necessary packages are being fetched from the PPA, preconfigured, unpacked, installed and set up (e.g. postgresql-9.0, postgresql-common, postgresql-client-9.0,...)
- If not already done a user "postgres" is created and assigned to the group "ssl-cert"
- Postgres dictionaries for english are installed
- A database cluster is created. A cluster in Potgres terminology is a storage area in the file system where a collection of databases that is managed by a single instance of a running database server resides.
- The configuration location is set to
/etc/postgresql/9.0/main - The data location is
/var/lib/postgresql/9.0/main - The Postgresql configuration files are stored to
/etc/postgresql/9.0/main/postgres.conf,/etc/postgresql/9.0/main/pg_hba.confand/etc/postgresql/9.0/main/pg_ident.conf - The standard port is configured to 5432
Postgresql will be configured to listen to the standard Port 5432 and the server will be automatically started after the installation process.
Step 2b (optional): Install pgAdmin III
pgAdmin III is the de facto standard tool for the administration of you Postgres server and databases. As Martin also provided the latest packages for this, you can easily install it with:
sudo apt-get install pgadmin3Step 3: Test your installation
Before you test the installation you should set up a new user for the Postgresql server. Although a standard user "postgres" exist, he shouldn't be used for operational work for security reasons. To create a new user, enter
sudo -u postgres createuser --superuser --pwprompt joergThis runs the command createuser under the user context of the "postgres" user and creates a new user with the name joerg. The new user will be a superuser (--superuser argument) and a prompt for the password of the new user will be issued.
Now you can start testing the server. Just open pgAdmin III and log in with your newly created user.
Kommentare
Kommentar veröffentlichen